Je Ne Regrette Rien, by Edith Piaf
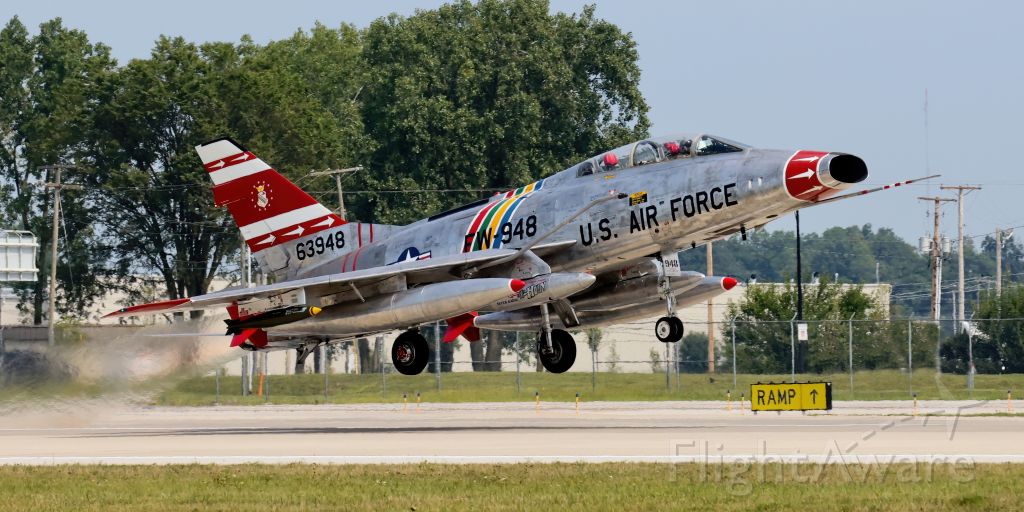
This was my assignment out of pilot training, UPT Class 67E, Laughlin AFB, Del Rio, Texas, in February 1967. I graduated second in my class, but first in flying, for which I was awarded the Commander's Trophy, awarded each class to the student with the highest flying average. So I graduated high enough in class standing to hold the F-100, since there were 10 of the F-100 slots available and only eight training bases. Otherwise the most desirable slots were two F-106s and 3 F-102s--and I knew I had no chance for those--but that just meant that there were a total of 15 airplanes that I was bidding on. Assignments were awarded based on class standing, but also on date of rank. And being that I was a lowly second lieutenant, a Captain would outrank me in the case of a tie. But with eight bases, there were potentially 15 guys ahead of me. So it was close. The guy in my class that graduated first, due to his high academic scores, was Captain Dennis Sombke, may he rest in peace. He got one of the F-106s and went on to the ADC (Air Defense Command) which meant that he didn't have to go to Vietnam, an added benefit to the delta dart assignment. Dennis had been a navigator up until he got the pilot training assignment. Most of us were 2nd lieutenants but there were a few Captain ex-navigators in our class.
You will notice in the photo above that this is a 2-seat F-100. I was to report to Cannon AFB for gunnery school and then on to my F-100 unit. My T-38 instructor at the time had a friend who went this same route and it turned out that after gunnery school he was assigned to the back seat of an F-100 (call sign Misty) in Vietnam. The Mistys were FAC airplanes (forward air controllers) with a not too stellar survival rate in Vietnam according to my information at the time. Plus there were plenty of back-seat F4 assignments in my class, and I was not keen on any "back-seat" jobs. So based on that rumor, I was able to change to the next best airplane in our class lineup: the C-130. Later when I was in Vietnam flying C-130s, I ran into a classmate of mine that had probably gotten the F-100 assignment that I had relinquished, and he was happy to be flying single-seat F-100s out of Tuy Hoa--the same base that I was based at. So you can say that you have no regrets in your life, and you shouldn't, but to this day I wish I had taken that F-100 when I had the chance!
A footnote to this story is that an old friend of mine, David Tokoph from El Paso, TX, had acquired a 2-seat F-100 when I ran into him again around 2005. He and I had been in business off shore, he in Mexico and I in Costa Rica, when we first met and struck up a friendship based on our mutual experiences in Latin America. David had become very successful, and built quite a War Bird collection in El Paso and had kindly offered to take me for a ride in his F-100. Unfortunately, he was killed flying his T-28 on August 14, 2015, before we could arrange the ride.
Tom Savrda’s RV-7 First Flight
Well, actually today was his second flight, but since the first flight on July 22nd was cut short by an erroneous oil temperature indication, I consider his "official" first flight was today.

Tom with Van and the RV-1 at Sun 'n Fun 2012
The oil temperature indication on his first flight was almost 300°F, but since his oil pressure was a very strong 90 psi, it was obvious that it was a calibration problem with his cockpit gauge. We had just gotten airborne and I was joining up on his wing with my RV-6 when he mentioned the high oil temperature. So we decided to make a precautionary landing and investigate the problem. And as it turned out, the problem was indeed a calibration issue and was quickly resolved. We had also inserted an accurate temperature sensor into his oil sump through the filler tube and measured the temperature to be around 195°F (very normal) right after landing, so that just confirmed that the temperature indication was indeed erroneous. Flight time was only 11 minutes because of the oil temp problem.
So today was the day. Tom wanted to get a solid hour of flight in today using high power settings—the standard way to break in a new engine.
We taxiied out to runway 4 at Vero Beach and departed in tandem, Tom first. With Tom having to use maximum power for break-in purposes, I needed to use a turning rejoin to be able to catch him. For the non-pilots, the only way to catch a faster airplane is to keep the radius of your turn less than the airplane out front. It becomes a geometry problem to comprehend how this works, just know that it does. So soon I was on his wing, but it was taking full power to stay with him, which I was able to do—barely.
Flying in formation is a skill that is acquired. It is not easy, but becomes second nature with training and experience. Now, try flying in formation using full power while continuously having to do a turning rejoin just to stay in position, at the same time snapping decent photographs with one hand while clearing for other aircraft. Not easy. Don't try this at home. Safety is paramount always, so I don't recommend doing this; however, my safety pilot decided to go play at the big fly-in at Oshkosh and left me high and dry. Needless to say the photography was very limited, but we managed to get a few decent shots. I used a 55-200mm telephoto zoom for these shots, which allowed me to move out to an extended formation position while shooting.
It was another hazy day down low today (more Sahara dust in the air) so ground shots were impossible. We were at 6,500 feet for these photos:

Tom Savrda's RV-7 Tail Number N732TS

This one is my personal favorite.

The "RV Grin"
And finally, the obligatory "RV grin" shot, whose purpose is to capture and celebrate the exhilarating feeling one experiences at the end of the first successful flight of an airplane you built yourself.
You are probably never going to see a nicer built RV-7. This is certainly the best one I've ever seen in terms of the outright craftsmanship and attention to detail. Proof of this is that the airplane flew straight, no heavy wing, no right rudder required in cruise! You really need to go around and inspect closely to see the outstanding fit and finish of this airplane. Oh, and the engine performed flawlessly—there were no leaks at all after the flight. Not a single squawk.
Nice job, Tom!
From HDR into Night
So this was a couple of nights ago. The plan was to get out on the compass rose before sunset to set everything up for this shoot. I planned on starting with a few HDR (high dynamic range) shots while the sun was still pretty high, and then switch to off-camera lighting to catch the post sunset and twilight. Here is one of the HDR shots:

HDR test shot no. 4
Here is another HDR shot to illustrate how carried away you can get with this stuff. I call this my "grunge" look, HDR to the extreme, makes it look more like an illustration than a photo. Not sure I like this but I see a lot of it around. Pretty obvious it's HDR, so I prefer the more subtle look.

HDR to the max.
Same as before, I had two strobes out front of the airplane gelled with orange. These are to provide rim lighting in front and under the airplane. Here is the shot taken right after sunset:

Off-camera lighting no. 1
Here is the set-up shot revealing the two strobes forward of the main gear and the diffuser umbrella next to the camera tripod:

This last shot (below) was taken as the last of the ambient light was fading out and as the new moon came into the frame. I went to flip on the navigation lights for effect, and they didn't come on. Later, I found a broken connector behind the switch. Oh well.

Off-camera lighting no. 2.
Learning the Off-Camera Lighting Technique
OK, so I passed the Strobist 101 course and have gone out and bought a few basics to get started in off-camera lighting. A pretty interesting part of the hobby, actually, and you can go as far as your time and money will allow. Instead of teaching the course, let me just delve into a few first attempts and then try to explain what is going on. Here is Max, my male Schnauzer model:

Max the miniature Schnauzer in his favorite chair.
In the shot above, I was practicing balancing my off-camera strobe light with the ambient light coming in through the window on the left here in my home office. I had one strobe set up behind and to camera right with an umbrella on a stand. The strobe illuminates the interior of the umbrella creating a nice soft, diffused light. I also used a backlight strobe above and to the right of the subject with what's called a snoot on it to direct the light in a narrow beam behind and above the dog's head. This provides the rim or back lighting. The trick, and it's not easy until the technique is learned, is to balance all of the light sources to create the desired effect. Next, I imported a famous male model to use in the same setup now that Max had served as my guinea pig. This is what I see when I look in the mirror every morning, and believe me, it's getting pretty scary (it's just an illusion, though; on the inside I'm still 24).

Famous high-dollar male model agreed to work pro-bono for this shot.
Okay, so much for the basics, but now let's try some real cool airplane at dusk stuff. In this shot I was attempting to use as much of the learning and equipment as I could—kind of a final exam for Strobist 101 and maybe graduate to Stobist 102. Here was the setup: I picked a day where I could see thunderstorms on the west coast of Florida building throughout the afternoon. Since I live on the east coast, this sets up some pretty amazing sunsets, if you're lucky. So I went up for a quick flight to check out the west horizon and the dissipating thunderstorms. I came back in and taxied to the compass rose (my usual spot for airplane photography). The plan was to orient the airplane such that the sunset was in front, camera behind, with two strobes set up low on the ground in front of the main wheels and hidden from view. Fill light was provided by a strobed umbrella on a light stand to camera right. I wanted to catch the intersection of the compass lines under the airplane and have it lit up, and the two strobes out front were intended for this purpose as well as to provide rim light around the front of the airplane. The camera was positioned to allow for the compass radials to lead the viewer from the edge to the center of the photo. Anyway, here is the result:

Strobist 101 final exam.
A couple of things that went wrong: I used a ½ CTO gel (an orange colored transparent film) in front of the forward strobes to simulate the rich light at sunset. The wind was blowing a little and blew the gel on one of the strobes right off its mount. So I got kind of a combination of light under the airplane as you can see. Also, I learned that the umbrella pretty much acts like a parachute and with any breeze at all, tips the light stand over. Luckily, I was able to catch it before it hit the ground. But now I use my trusty 25-pound shot bags on the legs of the tripod. I would have liked to have turned on the tail navigation light, but forgot. I also should have used my new LED instrument panel eyebrow lights to illuminate the panel, but forgot that too. Oh well, next time. Yes, it was a learning experience after all.
New Blended Airfoil Propeller
Had to go up today and clear my head. Actually, clear the vuvuzelas that had been buzzing in my head.
But mainly to fly off the 5 hour test flight period assigned by the FAA for my new prop. Why the new prop, I hear you ask? Several reasons. My original Hartzell prop was due its 6-year calendar inspection, so it all started with a simple inquiry as to the cost of this inspection. In the meantime, I had been following the development of the new "blended airfoil" propeller that I think was developed with Van's aircraft in mind and was being tuned to the RV's performance envelope. Van's was claiming an additional 3 knots true airspeed over the older model. Additionally, Hartzell has now pretty much eliminated all of the RPM restrictions that had plagued the older prop. Because of the unknown vibrational characteristics caused by the most common upgrades to our engines, e.g., electronic ignitions and higher compression pistons, Hartzell had issued a bulletin cautioning operation within certain RPM ranges, which really had been a nuisance. So when I immediately found a buyer for my old prop and realized that the net cost was going to be just over a thousand dollars, well, hell, let's go for it. No inspection required, no more RPM limitations, 3 knots more speed, and a pretty nice looking, high-tech prop to boot. It made perfect sense to me. Here's the new prop:

New Hartzell Blended Airfoil Prop
Flying around in circles can get pretty boring, so I took the camera and tripod along with me today to pass the time. I also have been testing an iPad and the Foreflight app as a possible replacement for most of the charts and other pubs required for IFR flight. And I took advantage of the time to practice some holding pattern entries at altitude, and on the autopilot, but, hey, it all counts towards IFR currency requirements.
Well, I haven't had much time lately for taking photos so I was glad I was able to shake off some of the cobwebs and get a few wide angle shots from the baggage compartment of my RV-6.
First thing I noticed was that my Koger sun shade was going to interfere with the lens' field of view, so I decided to slide it off the track and stow it.

Number 2 for takeoff behind a FlightSafety trainer.
I climbed up to 7,500 feet and checked out the prop, of course, but I also had a chance to observe the new GPS mode in the ForeFlight app on the iPad. So now you get enhanced geo-referencing, centers your chart on your position, posts relevant GPS data, and your course line is superimposed over the chart. Pretty cool. In a future post I will critique the iPad as an EFB and also the new RAM mount that I am expecting any day now. I'm currently using a special knee board for the iPad, but I think the RAM mount is going to be much better. You can see the RAM mount structure on the right side of the instrument panel where I had previously used it for my iPAQ PDA. This will adapt to the new iPad RAM mount. My hope is that the iPad is going to replace about 90% of the paper required to be on board.

Flying in a holding pattern at 7,500 feet.
I was also trying out a new shutter release cable seen here in my right hand, which is much more reliable than the wireless one I had been using. Yep, this is going to be just the ticket for inflight photography for sure. The wireless release had been intermittent, possibly being interfered with by the on board avionics.
Here we go down the beach on the way back home. Nice day today on the east coast of Florida.

And one more going down the beach:

I never get tired of this view!